Angulo
Angulo means angle or corner in Esperanto—and was just a nicely sounding name for my first App for Google Android. It is a handy and (hopefully) easy-to-use, minimal tool for measuring angles by pointing the device. The orientation is measured with the internal sensors for acceleration (gravity) and magnetic field. The original motivation was to measure slopes of roads and the like for OpenStreetMap, but it can just as well be used for any angles you like ... actually even for an approximate measurement on paper should you prefer that over using more conservative methods.
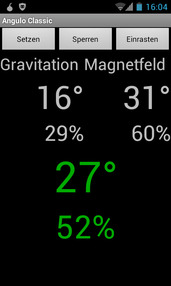
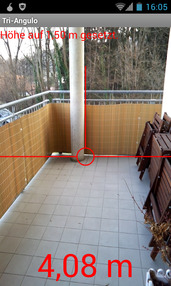
Since version 2.0, it can also be used to measure distances to points targetted by the camera, which is useful, for instance, to get a quick approximation of a room's size or other things. Here are screenshots of each tool in action:
Get It!

The project is free software and licensed under the GNU GPL v3, with the source hosted at SourceForge.net. See there if you're interested in the source. You can also find binary releases (aka .apk files) there. Or get the latest version Angulo 2.0 (signature) directly from my website here. For this link, you can also scan the QR code to the right. And last but not least, you can also find it in the F-Droid repository.
Usage, Help and Other Stuff
The short description is: Just try it out, be careful and check the results for plausibility; and be aware that there may of course also be bugs! Contact me if you find one or have any other suggestions! Have fun!
If that's not enough for you, below is some information about both Angulo Classic (which is the angle-measuring tool) and Tri-Angulo for distance meansurements.
Angulo Classic
The user interface is very minimalistic and thus hopefully also easy to use and understand. You can get a quick introduction into the usage in the application's options menu (pressing the menu button). But the basic idea is to point into one direction, set that as reference, then point into another direction and read off the angle the device was rotated in-between. As a little hint, in addition to the buttons you can also control the measurement via (long) tapping on the green degree display—this may be easier to use if you point with the device somewhere. Since version 1.3, there's also the option to set the reference direction to "level": This sets the gravity reference to the closest device axis, which can be used to get "exact" reference fixes to a cardinal direction. That way, you can use your device with Angulo as a water-level, for instance.
Note however, that every rotation counts (around all three axes put together). So be sure to rotate carefully! Also note that you will get three outputs: Namely the rotation in gravity and magnetic field as well as a "combined" value (see this document about how Angulo calculates the values and in particular the combined one). Obviously, if you rotate your device for instance around the vector of gravity (i. e., within a horizontal plane), there will be no change in gravity and thus the gravity-value will be zero. So please have that always in mind! The combined value (displayed in big, green letters) should in general be a more accurate estimate which shouldn't have such problems; but for certain cases (when your intended rotation axis is actually orthogonal to either gravity or magnetic field), it may still be better to use one of those values instead.
Since version 1.2, there are also preferences you can set: Namely the rate with which the sensors should be queried, and also whether or not multiple sensor values should be averaged in order to get smoother behaviour. Averaging can take into account the last 100, 10 or just the last value (effectively what Angulo did before this was added) for the values much, little and none. The four sensor rates correspond to the possible SENSOR_DELAY_* values in the Android SDK. It is also possible to control the screen orientation since version 1.3.
Tri-Angulo
This tool measures distances to points targetted by the camera. The basic idea is this: You have to configure "your height" (rather, at which height the device's camera is located), and Tri-Angulo measures the angle you are pointing the camera with respect to the direction of gravity just like Angulo Classic does. With these two data points, it is possible to calculate the distance between the device's projection onto the floor and the target using basic trigonometry.
It is important to note that this only works when the target is on the same height where you are standing (i. e., somewhere on the floor with no incline), and that the device's location counts, not where your feet are. This means that you have to consider the distance you hold the device in front of your body!
Copyright © 2011–2019 by Daniel Kraft — Home — Contact — Imprint

