Blog: OCR with Tesseract (2016-06-12)
This is the second part of my project to create a disk image of an ancient 80286 computer. The first post describes how I read the disk on the old computer and recorded data written to the screen with a video camera.
If you recall my last post, you will remember that it ended with me recording numbers on a computer screen with my video camera. This yields a video like this. Now, we have to process such a video to extract the raw data from it. This process is not entirely straight-forward, and requires multiple steps. The first of these is detecting the actual images we want to extract, i. e., all complete screens on which the output pauses. This can be done with a suitable heuristic approach, where we look at differences between images and output a frame each time the difference is sufficiently small.
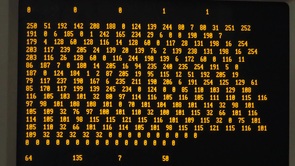
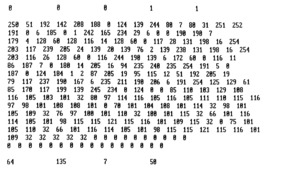
In a later stage, we want to apply OCR to extract the data from these images. This works much better on already preprocessed images, so we also convert the yellow-on-grey pictures to black-on-white binary images:
I used GNU Octave for that, with a small custom script. It has some parameters in it (for the various thresholds and cropping the image to the right area), which needed to be adapted whenever the camera position or light conditions changed too much.
The most difficult step, however, is the actual character extraction from the resulting images. For this, I've used Tesseract. It has proven to be a capable OCR package, although I had to experiment a bit to get everything right. Most importantly, I trained it for the specific font on the screen and for digits only. This greatly improved accuracy.
Thanks to the checksums I added (see the last post), I could use a Python script to read the OCR output and detect errors (or write the data in binary blobs if correct). For handling the errors, I discovered another neat trick: Rotating the input image by a few degrees possibly fixed the recognition. This allowed me to "fuzz" the failed images a few times, which corrected almost all errors eventually. For the very few remaining failures, I had to manually intervene. The most common error was (not surprisingly) a confusion between "0" and "8", especially on disk blocks that contained many zeros (because they were unused, for instance).
In the end, I was actually able to obtain a fully functional disk image. It boots successfully in QEMU and allows me to keep the old system alive!
Copyright © 2011–2019 by Daniel Kraft — Home — Contact — Imprint

